Windows 10 has several ways of sharing files and folders over a local network. Simple File Sharing is the most convenient and easiest option to create shared folders and it only takes a couple of minutes to get it configured.
While it may not be the most secure means of sharing folders over a network, it is a viable solution if you trust the devices connected to your home network. It is worth noting that as of Windows 10 build 1803, the way Windows handles file sharing over a local network has changed, making it a bit more secure.
Simple File Sharing On Windows 10:
To share files and folders in Windows 10 you need to do the following:
- Go to Windows File Explorer. Open it from the Start button or press and hold the Windows key then press and release the “E” key.
- Go to the folder you want to share. Right-click on it. In the menu that popped up, click on “Properties”. It should be the last option.
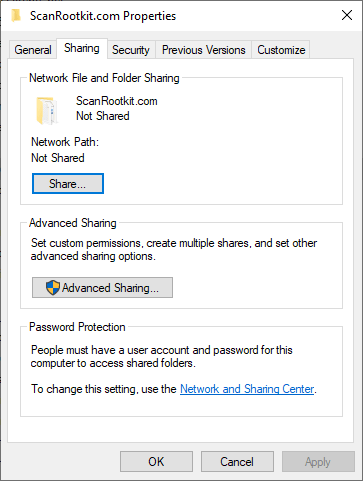
- A new small window will appear. It will have 5 tabs at the top. Click on “Sharing”. It should be the second one.
- In the “Sharing” tab, click on the “Share…” button.
- A new window will appear. From the drop-down menu, select the users or groups you want to share the folder with. For a home network, where user management across multiple devices is not possible, select the “Everyone” group.
- Below the drop-down menu, you should be able to see the newly added “Everyone” group. Next to the group, you will see the permission column. Select the kind of permissions you want to give everyone accessing the folder.
- Once done, click the “Share” button at the bottom right of the window, then click close.
This simple file sharing in Windows 10 is not the most secure way to share folders. There is an option to use “Advanced Sharing” options but they do not add much in terms of security or sharing features.
A good practice is to use permissions wisely when sharing files and folders. Since it is possible to have unauthorized or guest devices connected to the network, they will have access to the shared folder. To ensure that they do not delete or change files, the “Everyone” group should have only “Read” permissions.
Enable password protected sharing:
Another security option for simple file sharing is to enable password protected sharing. This can be done as follows:
- Go to Control Panel. Search for “Network and Internet”.
- Go to the “Network and Sharing Center”. You should see a link named “Change advanced sharing settings” on the left side of the window. Click on the link.
- Click on “All Networks” in the newly opened window and expand it. You should see one section called “Password protected sharing”. Turn it on. You will be prompted to set a password.
Password protecting your shared folders will be applied to all users. This feature only protects you from unauthorized access. It does not protect the files from accidental file deletes. Accidental deletes of files can be prevented either by setting up scheduled backups of the shared files or by allowing everyone to just read the files.
You must be logged in to post a comment.